I know, I know. It's been a while. I'm back in job limbo, and trying not to think too hard about it.
Also very busy in general with school, grad, wedding shower planning and life in general.
I was not very happy, however, when I thought my roof might be leaking, based on the spot that appeared on the ceiling in my bathroom. I was happy to find out that was not the case, thanks to my awesome brother, who did a bunch of roof yoga in my attic to figure out where the moisture was coming from.
Long story short, I owed him some dessert, and he picked date balls. I guess they are more commonly known as "fry pan cookies", and my grandmother used to call them "mice", but I prefer date balls.
I whipped up a batch last night using this recipe as my starter, but I don't really like adding nuts, so I use extra rice krispies, and I added in some rum flavoring for good measure as well.
Can't figure out why, but I have a heck of a time getting the coconut to stick to the outside. They stick to everything else, but not the coconut. Alas.
Showing posts with label dessert. Show all posts
Showing posts with label dessert. Show all posts
Sunday, May 18, 2014
Sunday, March 2, 2014
Baklava.
I made baklava for this month's Mediterranean themed food club. Lordy, it was good. Easier than I though it would be.


I modified a recipe I found online to get this.
1 pkg phyllo pastry
1/2 C butter, melted
2 C ground nuts (I used walnuts, but want to try pistachios. The recipe also called for chopped, but I found they just fell out)
3 tsp cinnamon
1 C water
1 C sugar
1/2 C honey
1 tsp vanilla
1 tsp lemon juice
Preheat oven to 350. Liberally butter a 9 x 13 pan. Mix together nuts and cinnamon.
Cut the phyllo in half so it fits the pan, and store under a damp tea towel until you need it. Place 2 sheets of phyllo in the pan, and brush generously with butter. Repeat 2 more times, and follow with a thin layer of nut mixture. Repeat the two sheets of phyllo, butter, two sheets of phyllo, butter, nuts pattern until you have 6 sheets of phyllo left. Generously butter between each last layer of phyllo, pressing down before you do so.
Slice into triangles or squares, cutting through all the layers. One pan should make about 30-40 depending on your size. Bake in oven approx 40 minutes.
While pastry is baking, combine water and sugar in a small saucepan over medium heat and bring to a boil. Add honey, vanilla, and lemon, and reduce heat, allowing to simmer approximately 20 minutes.
Remove baklava from oven when tops are golden brown, and immediately spoon syrup over the whole tray. Allow to cool totally before separating. Store in muffin liners, and drizzle with chocolate if desired.

Tuesday, February 25, 2014
Brownie Cake.
Had a great but tiring weekend going from conference and dance chaperoning to family dinners to fundraisers. Made dessert for dinner at Dom's, and was pretty happy with how it turned out. I made brownie cake (recipe to come) with maple whipped cream and a raspberry sauce. Yummy!

I also took the opportunity to sneak a bunch of post-its featuring terrible pick up lines into her house, and hid them without her or Ken knowing. Success.


Tuesday, October 15, 2013
Fall cookies.
Remember those sugar cookies I tried making ages ago??

Yah. Turns out the recipe STILL makes a lot of cookies. I'd forgotten about that. The 5 1/2 C of flour should have tipped me off.
Anyways, I wanted to make some cookies for my MUN meeting this week, and fall leaf shaped sugar cookies seemed like a good way to go. I even bought cute fall colored sprinkles at Bulk Barn.
Well, I took some to the lake for Thanksgiving, some to school today, and I still have a large bag in my freezer. Yikes. But, they are as tasty as ever, and got good reviews everywhere (although, let's be honest, teenagers will be thankful for just about any treats that are free).

But actually. How cute are they?
Sunday, June 16, 2013
Parfaits.

"You know what else everybody likes? Parfaits. Have you ever met someone, you say, "Let's go get some parfait" they say "Hell no, I don't like no parfaits"? Parfaits are delicious."
I made some desserts for my dear Lindsey's wedding shower this weekend. I wanted to make some light and spring-like things, and was inspired by this month's food club theme (spring) to make some lime parfaits. For food club, I made this recipe, and while they were good, I wasn't too thrilled with the lime mousse layer.
For Lindsey's shower, I made my standby strawberry cupcakes (so good) and changed the mousse to a version I had been given by a friend. I found it much less punch-in-the-face sweet, and a nice light texture. Piped into the little mugs I bought at Dollarama, I was rather impressed with myself.

Lime Parfaits:
1/4 C butter
2 T brown sugar
1 C graham cracker crumbs
1 container Cool Whip
1 can sweetened condensed milk
3/4 C lime juice
zest from 2 limes
(I added a little bit of food coloring to make it look "limey")
Melt butter in a sauce pan over medium heat. Add brown sugar, and stir until bubbly. Mix in graham cracker crumbs, and stir for a few minutes. Transfer to a bowl to cool, breaking large chunks into a fine powder.
Combine Cool Whip, sweetened condensed, and lime juice. Chill until ready to use.
Using a large piping bag, fill all containers (this filled 18 2 oz glasses really nicely, with a little leftover. Each cup was about a half portion) a third full of lime mousse. Add a spoonful of graham cracker crumbs, and top with another layer of mousse.
Chill until ready to serve.
 |
| I love that the lighting makes this picture look retro. |
Melt
butter in heavy small skillet over medium heat. Mix
in brown sugar and stir until bubbling, about 1 minute or less. Mix in
crumbs; stir
until color deepens, about 3 minutes. Turn out onto plate and cool. -
See more at:
http://foodfashionandflow.blogspot.ca/2012/09/key-lime-parfaits.html#sthash.zVnXRqtD.dpuf
- 3 tablespoons unsalted butter
- 2 tablespoons white sugar
- 1/4 cup powdered sugar
- 1 tablespoon light brown sugar
- 1/2 cup graham cracker crumbs
- 1 14-ounce can sweetened condensed milk
- 1/2 cup fresh lime juice
- 1 tablespoon grated lime peel
- 1-2 cups chilled whipping cream
- Pure Vanilla Extract
- See more at: http://foodfashionandflow.blogspot.ca/2012/09/key-lime-parfaits.html#sthash.zVnXRqtD.dpuf
Saturday, May 4, 2013
Corn Flakes.
Spring this year is all about change for me. Ken moved out, and this week I'm getting a new roommate (an awesome coworker). My job status for the fall is unknown, which causes me all kinds of anxiety. School year is winding down, but there is still so much to do, so many shows to go to, grads coming up super quick... Sheesh!
Sometimes you just need to take a step back and enjoy the simple things in life. I hung out with my mom today, and did some baking. Made some pies for a family thing, and made a treat I haven't had in ages..
We used to make toffee flakes (corn flake stacks according to Heather) all the time. But years ago when they stopped making the full bars of Mackintosh toffee, I figured we were out of luck. Not long ago, my dad found small pieces of Mackintosh toffee, but I had no clue how much to use. Thanks to a (different, but still awesome) coworker, I now know how much to use! So happy! I can make the awesome cereal bars again!
Toffee Flakes
2 bags of Mackintosh toffee pieces (1 bag is equal to 3 of the old bars)
3 T butter
3 T milk
6 C corn flakes (although I ran out, and used kamut flakes instead)
Melt together toffee, milk and butter over low heat until smooth. Stir in corn flakes. Drop in small piles on a lined cookie sheet and cool.
Try not to eat them all at once. Mmmm. Tastes like childhood.
Sunday, January 6, 2013
Ginger cookies.
 |
| Not right. |
Using the recipe she gave me, I was unable to reproduce her cookies. Obviously at some point she changed the recipe in a slight but important way. Her cookies spread out and were soft and chewy; my cookies were tall and dense. The flavor was there, but the texture was off.
 |
| Right. |
Ginger Creams
Mix together:
1/3 C shortening
1/2 C sugar
1 small egg
1/2 C molasses
1/2 C warm water
In a separate bowl, mix together:
2 C flour
1/2 tsp salt
1 tsp ginger
1/2 tsp cloves
1/2 tsp cinnamon
1/4 tap baking soda
Chill dough. When chilled, add a couple of tablespoons of water the smooth out the dough (about 4 Tbsp). Drop rounded teaspoonfuls about 2 inches apart on a lined cookie sheet. Bake at 400 for 10 minutes. Top with cinnamon flavored icing.

Wednesday, November 14, 2012
Sugar Cookies.
My dept head found out that I only have 2 sets of cookie cutters (gingerbread men and leaves) and apparently that was a big deal. (who knew) To remedy this, she loaned me all the holiday themed cookie cutters she had from when her boys were small. This was a big hint that I should make cookies and bring them in for the dept (and when I say big hint I mean she came right out and told me).
I found a nice looking sugar cookie recipe on Pinterest (so yummy!) and the end result is LOTS of cookies. Mostly hearts and stars (traditional and David), with the occasional flower and Russian mobster for good measure.
I found a nice looking sugar cookie recipe on Pinterest (so yummy!) and the end result is LOTS of cookies. Mostly hearts and stars (traditional and David), with the occasional flower and Russian mobster for good measure.
 |
| Seriously. I think this is the Russian mobster and Ukrainian grandmother of cookie cutters. |
 |
| SO many cookies! |
Sunday, May 6, 2012
Peanut Butter Cups.
At the same time as the Strawberry Cupcake Adventure, Dominique and I also made these.

Unfortunately, they were a bit overshadowed by the awesomeness that was the strawberry cupcakes.

They were quite delicious, but extremely rich. Snack with caution, my friends.


Unfortunately, they were a bit overshadowed by the awesomeness that was the strawberry cupcakes.

They were quite delicious, but extremely rich. Snack with caution, my friends.

Monday, April 30, 2012
Strawberries.

So Dominique and I made these this weekend... and there are pretty much no words.

They were AMAZING.

Try them. You won't regret it.

They were so beautiful.

Thursday, April 12, 2012
Lemon.
Tried out some new recipes last week. One in particular was for a Lemon Creme Torte (recipe from the good ol' Williams Sonoma Baking Book).
Wasn't my favorite (too sweet: too much condensed milk, not enough lemon) but it was very pretty, a challenge to make and smelled divine.
 I learned several things while making this pie...
1. Apparently rice is not always the best substitute for pie weights.
2. A thumb is a perfectly acceptable substitute for a lemon reamer (as long as you don't have any paper cuts)
3. Decorative lemon slices are easier to make than you'd think.
4. Making candied citrus peel is much more involved than candied flowers.
Wasn't my favorite (too sweet: too much condensed milk, not enough lemon) but it was very pretty, a challenge to make and smelled divine.
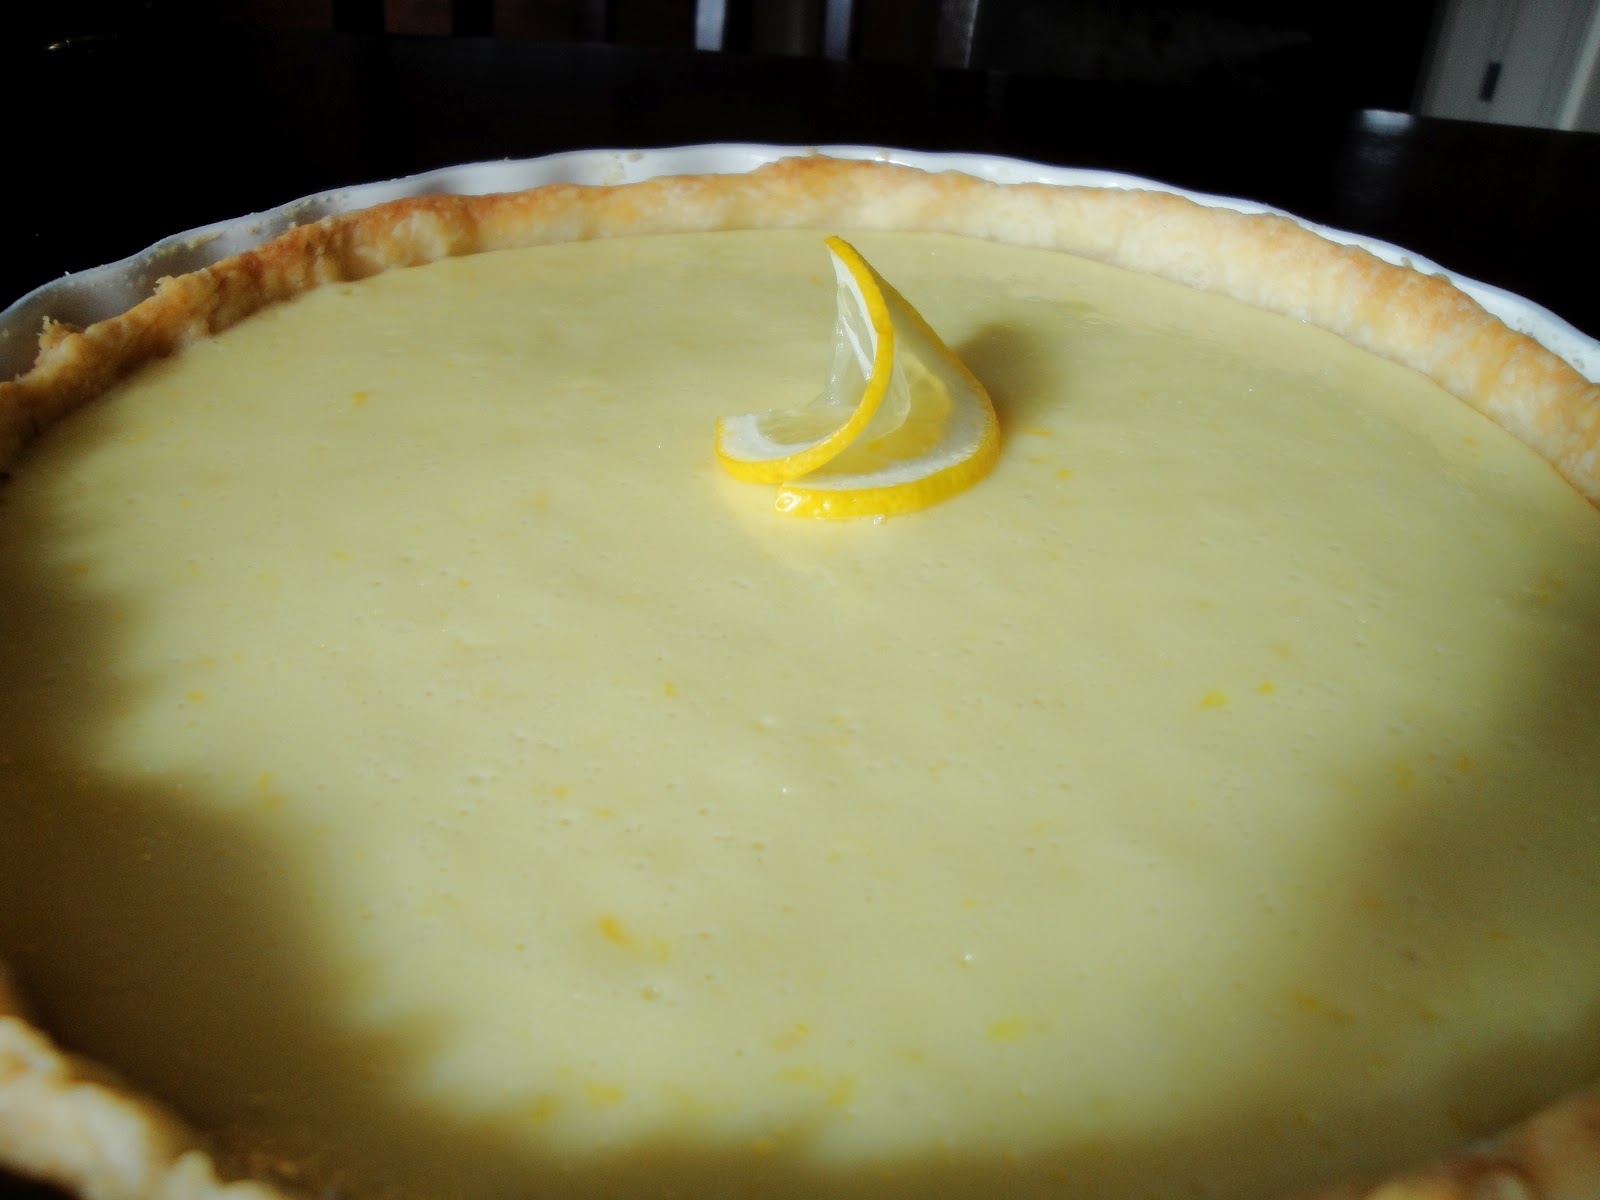
1. Apparently rice is not always the best substitute for pie weights.
2. A thumb is a perfectly acceptable substitute for a lemon reamer (as long as you don't have any paper cuts)
3. Decorative lemon slices are easier to make than you'd think.
4. Making candied citrus peel is much more involved than candied flowers.
 |
| I also made these using leftover pie crust and saskatoon jelly. |
Tuesday, April 10, 2012
Lime.
For Easter, we had a large group supper at the lake (starring that massive turkey). I decided to make some lime squares, rather than my usual lemon, after being inspired by this blog. I didn't bring any green food coloring with me, so they were au natural. They were super delicious, and I will definitely be making them again!

Know what else I want to make? These...

Know what else I want to make? These...
Saturday, March 31, 2012
Pie Crust.
I was probably about 8 the first time I made pies with my grandmother, and I still use the same recipe she did. It's pretty fool proof, and works for all your short-crust pastry needs. The best thing about it is it makes enough for about 3 large pies (or 4 smaller ones, depending on the size of your pie plates) and freezes very well, so you can make crust and pies on different days. The original recipe called for 5 cups of flour, but I always found there was not enough egg-water mixture to go around.
4 1/2 C flour
1 tsp baking powder
1 tsp salt
1 lb lard
1 egg
1 Tbsp vinegar
3/4 C cold water (mixed in with egg and vinegar)
Mix flour, baking powder, and salt in a large bowl. Cut in slices of lard. Using a knife (or pastry cutter) cut into small chunks, then use your hands to work until it's crumbly (Remove jewellery!)
Beat egg, and combine with water and vinegar. Pour small amounts over flour mixture, incorporating with a fork. Don't overmix! This will make the crust tough. (As discussed here...)
Gather dough into bottom of the bowl, and divide into three parts. Roll and wrap in plastic wrap. Refrigerate until needed or store in an airtight container in the freezer.
 |
| Saskatoon Pie |
Saturday, March 24, 2012
Baking Adventures.
Well, it's Spring (even though it's snowing buckets here) and that means wedding season is around the corner!
I am once again making cupcakes, this time for my friend Gina's wedding. Her colors are yellow and grey, and I had a stroke of inspiration to make lemon cupcakes (and the perennial favorite, chocolate) in foil liners.
I didn't have a lemon cupcake recipe, so I tried out this one (but added about two teaspoons powered lemonade and a hint of yellow food coloring) with Dominique and Amy last weekend, and it was GOOD. Super lemony, very moist, and overall delightful.
The icing doesn't look too yellow here, but my plan is to ice both the lemon and chocolate with yellow icing.
The challenge at this point is going to be making and getting them to Calgary looking pretty, since the wedding is the day after the last day of school!
 |
| Photo taken by Dominique! |
Saturday, January 28, 2012
Key Lime Pie.
 At the beginning of January, my dear friend Heather came up to visit me from Calgary. We have been BFF's since about Kindergarten, and even if we don't get to see each other as often as we'd like, I always try to make some time to hang out. We have always enjoyed cooking and baking together, and the weekend was no exception. For dessert, we made the easiest Key Lime Pie recipe (her mother's) with the Key Lime juice she brought me back from Florida. It's super light and would be excellent in the summer time, but it was delightful even in January.
 Some day I will try making a baked key lime pie (you know... the one with 8 egg yolks?) but I would probably put this on top instead of a meringue.
Easy Key Lime Pie
1 container Cool Whip
1 can condensed milk
1/3 C key lime juice
graham cracker crust
Allow the Cool Whip to thaw (this takes the longest). Mix together the first 3 ingredients. Pour into the graham cracker crust, and refrigerate until firm(er). Enjoy!
Told ya it was easy.

Friday, January 6, 2012
Butterhorns.
I am not a huge fan of cookies. I don't really know why. They have just never appealed to me as much as say, pie. Or tarts. Or cake. So when I felt like making cookies the other day, I wasn't entirely sure what to do... make cookies I probably won't eat? (although that wouldn't be a bad idea, let's be honest...)
As I was flipping through my recipe book I came across the perfect compromise: butterhorns. A little flaky pastry with cinnamon and sugar wrapped up in them, they are kinda like cookies. But better.
2 C flour

2 tsp cinnamon
1/2 C white sugar
1/4 C crushed walnuts/pecans (optional)
Cut the butter into pieces and cut into the flour, creating a crumbly mix. Add the cream and yolk, and mix until combined. If necessary (depending on the size of the yolk you used) add milk until most of the flour is incorporated. Divide the dough into 5 balls and refrigerate until firm.
On a lightly floured surface, roll out dough balls one at a time, as if you were making a pie. Sprinkle the dough with the cinnamon-sugar mixture. Slice dough into 12 wedges, like a pizza. Starting at the wide end, roll up dough and place on a lined cookie sheet. (Lining the baking sheet will make your life much easier! Saves heaps of time on the cleanup of melted butter and sugar!)
Bake at 350 for 20 minutes, or until lightly browned. Can be drizzled with icing sugar if you like, but they are divine as is. I challenge you to each just one!
As I was flipping through my recipe book I came across the perfect compromise: butterhorns. A little flaky pastry with cinnamon and sugar wrapped up in them, they are kinda like cookies. But better.
Making pastry is often made out to be more challenging than it actually is. There are only two tricks... follow the recipe exactly and don't get overly enthusiastic with the mixing. Following the recipe exactly means using butter when it says butter, and shortening or lard when it says shortening or lard. The key to a nice flaky pastry is to have little pockets of fat that will melt away, leaving a space behind. Since different fats have different melting points, substituting one for another can affect the cooking time, appearance and texture of the final product. Getting overly enthusiastic with the mixing causes you to pulverize all the little fat blobs, meaning there are fewer pockets left behind when the fat melts. This causes the pastry to get tough and chewy - even though the dough will look nice before you roll it out. The most challenging thing about making pastry is to not stress!
Butterhorns
2 C flour

1 C cold butter
1 egg yolk
3/4 C cream with 1/4 tsp vanilla
1 T milk (if needed)
2 tsp cinnamon
1/2 C white sugar
1/4 C crushed walnuts/pecans (optional)
Cut the butter into pieces and cut into the flour, creating a crumbly mix. Add the cream and yolk, and mix until combined. If necessary (depending on the size of the yolk you used) add milk until most of the flour is incorporated. Divide the dough into 5 balls and refrigerate until firm.
On a lightly floured surface, roll out dough balls one at a time, as if you were making a pie. Sprinkle the dough with the cinnamon-sugar mixture. Slice dough into 12 wedges, like a pizza. Starting at the wide end, roll up dough and place on a lined cookie sheet. (Lining the baking sheet will make your life much easier! Saves heaps of time on the cleanup of melted butter and sugar!)
Bake at 350 for 20 minutes, or until lightly browned. Can be drizzled with icing sugar if you like, but they are divine as is. I challenge you to each just one!
Monday, December 19, 2011
Rosettes.
I love working in a big school - the large staff means there is always someone else who is interested in similar things as you. This past year, our lab technician and I have discovered a mutual love for baking - we will both bring in cookies (him) and cupcakes (me) for the rest of the department to nibble on and share recipes.
So I blame him for the events of the past week... in a moment of weakness I agreed to sign up for the Christmas Cookie Exchange... and then I discovered after that I was responsible for bringing 7 and a 1/2 dozen cookies to an after school event. On a Thursday. I don't have time for this!? Especially when I was in Jasper the previous weekend.
Plus, I am not one of those people who does things half-heartedly. Go big or go home. So of course I can't bring lame cookies to a cookie exchange... (I will not be the person who shows up with chocolate chip cookies! I won't!)
In wanting to bring something unique, something most people will not have tried or made before, I settled on rosettes. My grandmother made them every Christmas and they are definitely a family favorite. Because they are so light and delicate, my grandfather apparently used to eat several because they are nothing more than "wind, air and suction sauce". Whatever that means.
My parents came to the rescue, and loaned me there kitchen and their hands, since this recipe requires fair amount of work per cookie (but soooo worth it!).
 2 eggs
peanut oil for deep frying
Heat at least 3 " of oil in a pan to 365 F. Place the rosette iron in the hot oil for 60 seconds to heat up.
So I blame him for the events of the past week... in a moment of weakness I agreed to sign up for the Christmas Cookie Exchange... and then I discovered after that I was responsible for bringing 7 and a 1/2 dozen cookies to an after school event. On a Thursday. I don't have time for this!? Especially when I was in Jasper the previous weekend.
Plus, I am not one of those people who does things half-heartedly. Go big or go home. So of course I can't bring lame cookies to a cookie exchange... (I will not be the person who shows up with chocolate chip cookies! I won't!)
In wanting to bring something unique, something most people will not have tried or made before, I settled on rosettes. My grandmother made them every Christmas and they are definitely a family favorite. Because they are so light and delicate, my grandfather apparently used to eat several because they are nothing more than "wind, air and suction sauce". Whatever that means.
My parents came to the rescue, and loaned me there kitchen and their hands, since this recipe requires fair amount of work per cookie (but soooo worth it!).
Rosettes are a Scandinavian cookie that is made from a light batter (think pancakes) and then each cookie is deep fried in peanut oil on a cast iron form. You need a rosette iron for this, but they're really easy to find online or in specialty kitchen stores.
Rosettes
 2 eggs
1 T sugar
1/4 tsp salt
1 C flour
1 C whole milk
1 tsp vanilla
1 C icing sugar
Beat eggs slightly. Add 1 T sugar and salt. Add flour and milk alternately, blending until smooth. Stir in the vanilla - batter should be about the consistency of pancake or crepe batter.
Heat at least 3 " of oil in a pan to 365 F. Place the rosette iron in the hot oil for 60 seconds to heat up.
Dip the iron into the batter, making sure not to allow the batter to run over the top (or you'll never get the darn things off). Immerse the coated iron in the hot oil and fry for around 25 seconds (until light brown).
Using a fork, slip the rosette off onto a paper towel and repeat.
Coat rosettes in icing sugar when they are cool and store in an air tight container. One recipe makes about 3 dozen cookies.
Sunday, November 20, 2011
Oatmeal Crispy Cookies.
Well, winter has kicked in totally over here (it was -27 yesterday.... brrrrrr!) which means I want to bake. Constantly.
Since I don't really have time to constantly be baking, I have to settle for making a few old favorites to tide me over.
My paternal grandmother was an avid baker - she is the one who taught me how to make pies, provided me with the recipes for gingerbread, molasses cookies, tarts, cakes... you name it and she made it.
My maternal grandmother on the other hand... well, she had a few trusted recipes that she made time and time again. Some of my most vivid memories of her involve eating cookies in her kitchen, at the avocado green formica table. She only ever seemed to make one kind of cookie, and the house always smelled of Oatmeal Crispies.
After she passed away, I kinda forgot about the cookies... I'd never made them, and we didn't have the recipe. A few years ago, however, my mother got the recipe from my aunt, and I've been making them ever since... they are so simple and tasty, how could you not??
In a large bowl, cream together:
1 C butter
1C brown sugar
1 C white sugar
Add:
2 eggs
2 tsp vanilla
In a separate bowl, combine:
1 1/2 C flour
1 tsp baking soda
2 C oatmeal
1 C coconut
2 C rice krispies
Stir dry ingredients into wet ingredients. You'll need to get in there with your hands to really blend it! Roll dough into 1" balls, and flatten with a fork onto a cookie sheet covered in parchment. (They really spread out.. give them lots of space! And flatten them good... they puff up otherwise!) Bake for 6-8 minutes at 350. Cool slightly on cookie sheet, and then remove to a wire rack to cool completely before enjoying!

Since I don't really have time to constantly be baking, I have to settle for making a few old favorites to tide me over.
My paternal grandmother was an avid baker - she is the one who taught me how to make pies, provided me with the recipes for gingerbread, molasses cookies, tarts, cakes... you name it and she made it.
My maternal grandmother on the other hand... well, she had a few trusted recipes that she made time and time again. Some of my most vivid memories of her involve eating cookies in her kitchen, at the avocado green formica table. She only ever seemed to make one kind of cookie, and the house always smelled of Oatmeal Crispies.
After she passed away, I kinda forgot about the cookies... I'd never made them, and we didn't have the recipe. A few years ago, however, my mother got the recipe from my aunt, and I've been making them ever since... they are so simple and tasty, how could you not??
Oatmeal Crispy Cookies
In a large bowl, cream together:
1 C butter
1C brown sugar
1 C white sugar
Add:
2 eggs
2 tsp vanilla
In a separate bowl, combine:
1 1/2 C flour
1 tsp baking soda
2 C oatmeal
1 C coconut
2 C rice krispies
Stir dry ingredients into wet ingredients. You'll need to get in there with your hands to really blend it! Roll dough into 1" balls, and flatten with a fork onto a cookie sheet covered in parchment. (They really spread out.. give them lots of space! And flatten them good... they puff up otherwise!) Bake for 6-8 minutes at 350. Cool slightly on cookie sheet, and then remove to a wire rack to cool completely before enjoying!

Be warned... this recipe makes a lot of cookies! Just how many is unclear. My grandmother was such a fiesty lady... when my aunt was getting the recipe from her, she asked my granny (who was about 85 at the time) "how many cookies does it make?" Grandma's response?
...
"Damned if I know."
I know exactly who I want to be when I grow up.
Tuesday, November 8, 2011
Gingerbread.
I love gingerbread. It always reminds me of Christmas and winter and decorating gingerbread men with my dad.
I pretty much love molasses cookies in general. Molasses is made from the leftovers during the extraction of sugar from cane juice. There are different types of molasses depending on how much of the original sugar remains from processing (be sure to use the correct kind of molasses! I once tried to use fancy molasses to make cookies... they were awful).
I pretty much can't make anything with molasses without thinking about the Boston Molasses Disaster (aka The Great Molasses Flood). On a hot day in 1919, a huge tank of molasses exploded and an immense wave (40 ft!) of molasses swept through the city. I know this sounds funny... but it wasn't. 21 people were killed - caught and smothered in the waist-high flood - and around 150 people injured. Apparently the fire department attempted to wash the molasses away afterwards, but (as anyone who's ever cooked with molasses knows) adding water to molasses creates a nice foam... you need lots of hot water to dissolve it away.
While I'm sure it would have been an incredibly frightening thing to witness, I have private imaginings that a molasses-tsunami would move at the same speed it pours out of my carton... that residents would see this slow-motion giant wave bearing down on them... "iiiiit'sssss cooooooomiiiiinnnnnnng..... ruuuuuuuuuuun..... nooooooooooooooooo"
...
Anyways.... Here is my dad's gingerbread recipe! I like it because the cookies turn out nicely soft and chewy, but still firm enough to handle and decorate (no teeth-breakers here!) My mom and I made some last weekend when my cousins from Denver were in town.
Gingerbread Cookies
 |
| Mittens! |
1/2 C shortening or butter
1 C brown sugar
1 1/2 C cooking molasses
1/2 C cold water
6 C sifted flour
1 tsp salt
1 tsp ginger
1 tsp cloves
1 tsp cinnamon
2 tsp baking soda dissolved in 3 Tbsp cold water
In a large bowl, mix together butter, sugar and molasses until smooth. Stir in 1/2 cup cold water. (will look funny as butter separates a bit!)
 |
| Dough. Looks like nothing. |
In a medium sized bowl, sift together flour, salt and spices. Slowly add the dry ingredients to the wet, mixing with your hands when the spoon gets to cumbersome. Stir in soda dissolved in water and form dough into a ball.
Cover cookie dough and chill. (I usually leave overnight. Turn it into a two day activity).
Roll out dough 1/2" thick, and cut out with your favorite cookie cutters (try not to use ones with really small pieces... these get dry quickly!)
Bake 350 on parchment lined cookie sheet. Do not over bake!! - only needs 8-10 minutes! (depends on your oven)
When totally cooled, decorate to your heart's content!
 |
| In honor of the Sanderman cousin reunion, I put my gingerbread people in lederhosen. Because, you know, we're just so German....? |
Monday, September 19, 2011
Peanut Butter.
A few days ago, I wanted to make a quick dessert to take to a friend's house... but it had to be gluten-free! (Most of my baking is decidedly not gluten-free.) Since I happened to have mini marshmallows and butterscotch chips on hand, I whipped up some peanut butter squares.
I mostly followed my friend Stef's recipe, but I didn't have quite enough butterscotch chips, so they were a bit softer than they should have been because I somehow figured that extra peanut butter would make up for it. (It didn't.) So if you want to make them yourself (of course you do... because they are heavenly) you should follow her directions better than I did!
They were a big hit at the little get together I went to... even if they did spend most of the night on the patio so they would stay firm...

Subscribe to:
Posts (Atom)